Overview of Planner
Planner is a visual tool that is very easy to customize and use.
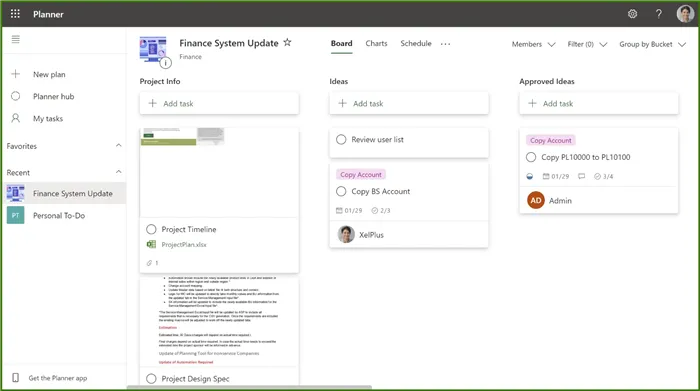
If you are familiar with Monday.com or Trello, you will see many similarities with Planner.
Tasks are assigned using cards where tasks are assigned to team members and task history can be viewed.
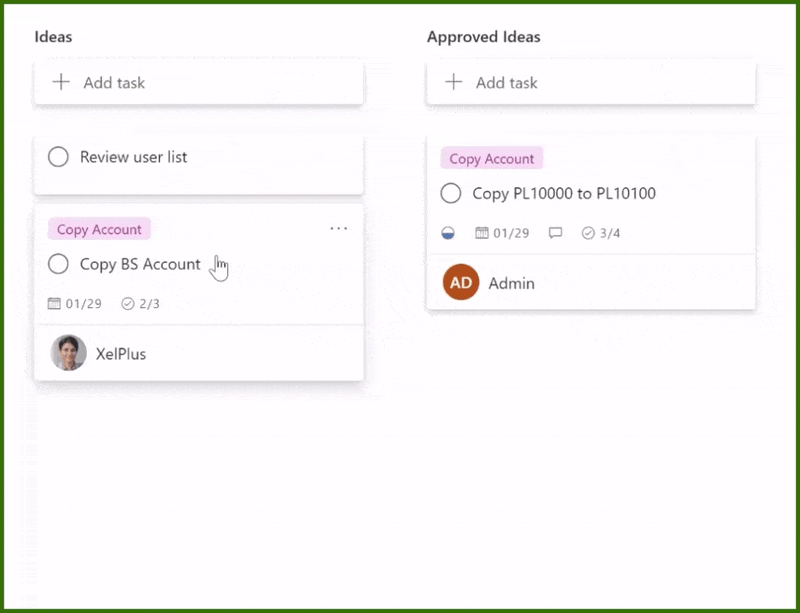
Tasks can be organized using buckets and easily moved from one bucket to another.
You can also track progress and deadlines, filter data, and integrate Planner activity with other Microsoft applications, like Microsoft Teams.
What Microsoft Planner is NOT
Just as it is important to understand what Planner is used for, it is also important to understand that Planner is NOT intended for.
- Planner is not a tool for large and complex projects where you need to manage resources, costs, and scheduling.
- Planner is not intended to manage dependencies and relationships between tasks.
For these features, Microsoft Project is a tool better suited for the job.

Featured Course
Black Belt Excel Package

Using Microsoft Planner
Microsoft Planner can be accessed directly from the Office.com website or your Microsoft Teams desktop.
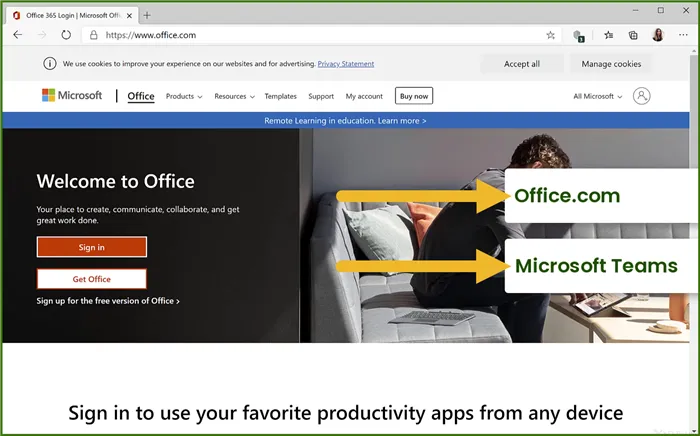
NOTE: Planner is a browser-based application. Aside from the downloadable versions for iOS and Android, there is not a locally installed version of Planner for the Windows environment.
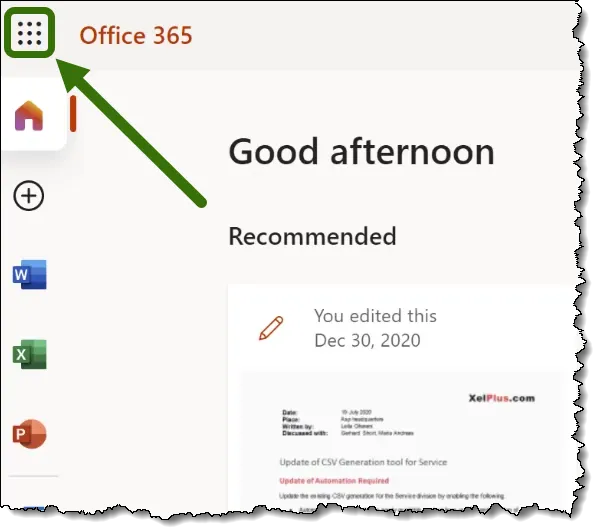
If you have logged into your Office 365 account through Office.com click the App Launcher (upper-left) to display your app subscriptions.
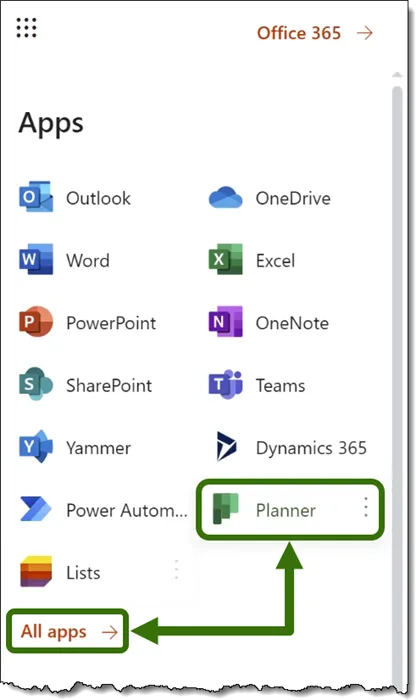
If you don’t see a link for Planner, click the All Apps link to display the full app subscription list.
Clicking the Planner link will take you to the Planner Hub.
The Planner Hub displays all the plans you have created as well as plans you have been added to by others.
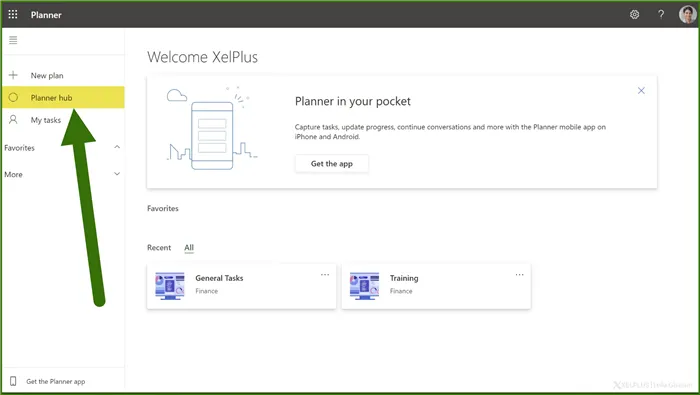
A plan can be thought of as a project; something that needs to be done that may or may not involve smaller tasks.
Starting a New Plan
To start a new plan, click the New Plan button (upper-left).
Give the plan a name.
Optionally, if you want to share your plan with an existing Microsoft 365 group or Microsoft Teams team you are a member of, you can click the below button to display a list of those groups.
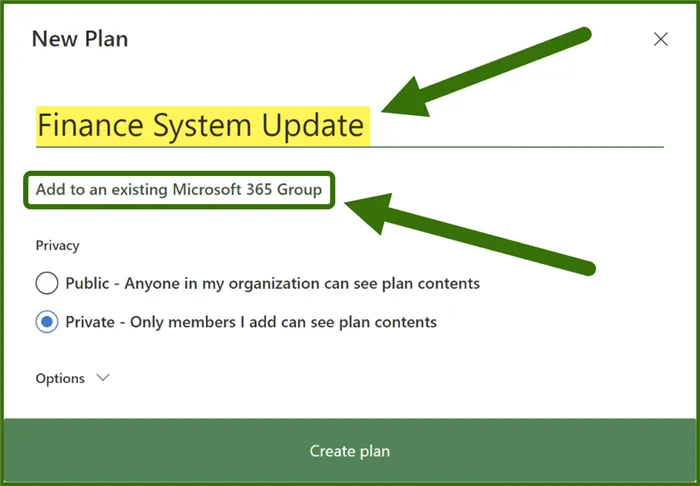
If you select one of these groups, all members of the team will have access to this project.
Setting Your Privacy Options
You can set your privacy options to one of the following:
- Public – The plan is viewable by anyone within the organization.
- Private – Only team members of the plan have access to the plan information. This is also useful if the plan is to only include yourself or there are no available Teams available.
For our example, we will assign the plan to an existing group called “Finance” and name the plan “Finance System Update”.
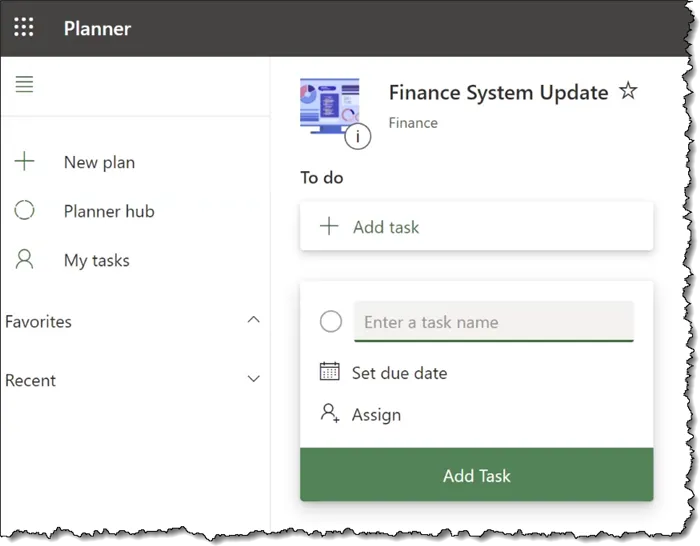
Because Planner is a collaborative tool, everyone on the “Finance” team can contribute to the plan.
The Board View and Creating Buckets
The Board View displays all your plans.
Plans are arranged in what is known as Buckets.
Buckets are groups of similar tasks. The way you organize your buckets is largely dependent on your organizational style and types of projects. You may want to have a separate bucket for each department within an organization, each phase of a project, or each chapter of a book. Buckets are very much a personal preference feature.
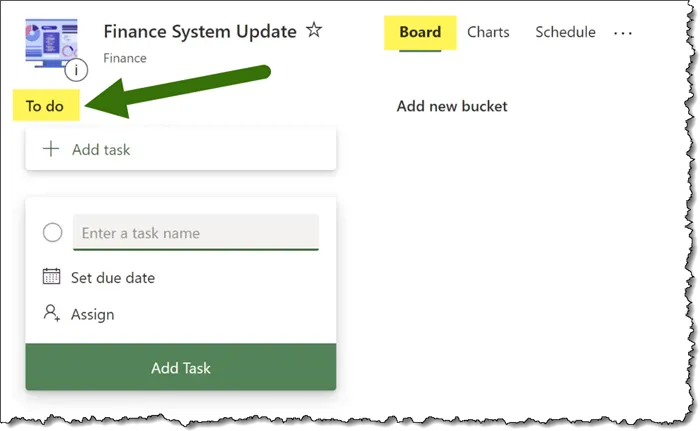
Creating Buckets
To create a Bucket, click the “Add New Bucket” button and provide a name for the Bucket.
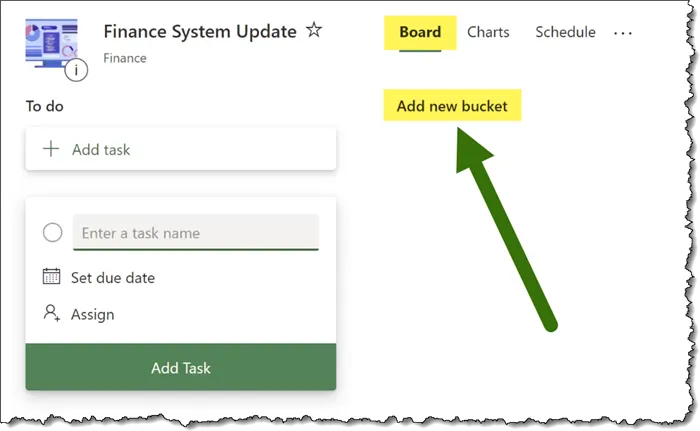
Creating Tasks

Once you have your Bucket(s) created, it’s time to create Tasks to place in the Buckets.
Tasks can be created under a specific Bucket by clicking the “Add Task” button. This creates a new card.
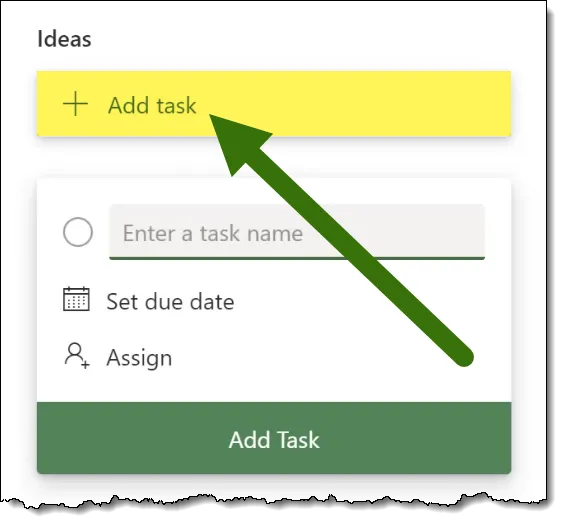
You can give the task a name as well as assign the task to a team member (or members) along with a due date.
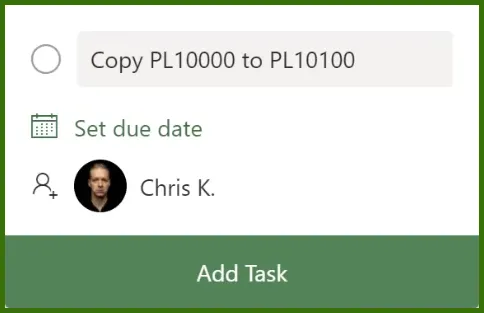
Assigning a team member to a task will automatically send that team member an email notifying them of their newly assigned task.
Aside from the task’s name, all other controls are optional and can be added, modified, or removed later.
Adding Task Detail
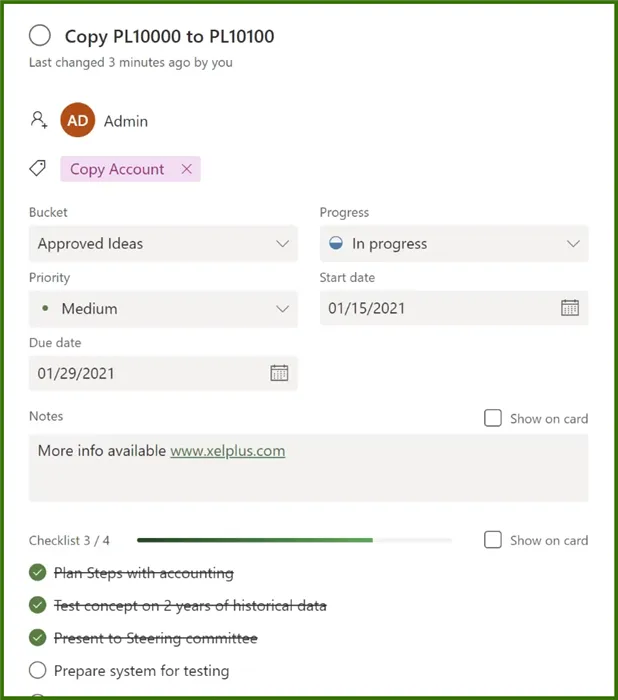
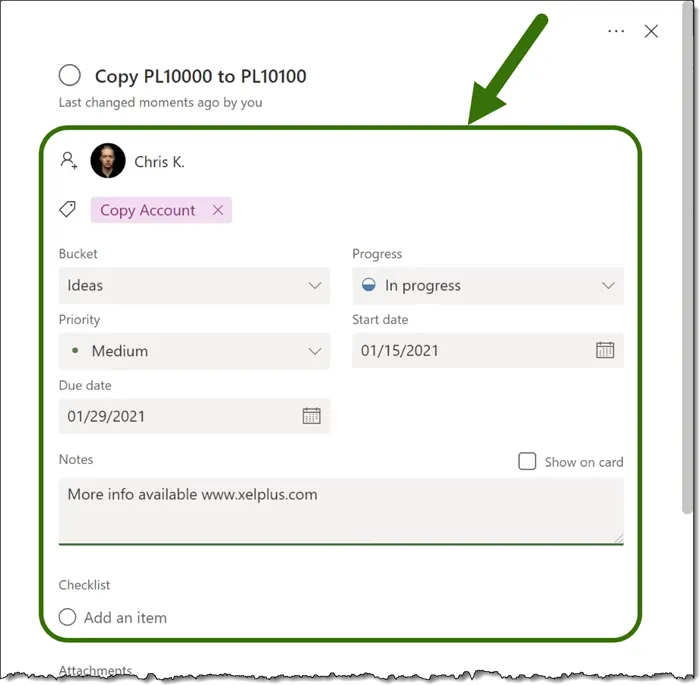
When a Task is clicked, the details of the task are displayed.
This allows you to add information to the task that was not originally offered.
Information like:
- Assign a label and color to the task (useful for identification and filtering)
- Setting the progress of the task
- Setting the priority of the task
- Setting the start and due dates
- Adding detailed notes and comments (hyperlinks will be “clickable”)
- Adding checklist items
- Adding file attachments from your local computer, SharePoint, or a shared link (files added from local storage will be uploaded to your SharePoint drive)
The summary card can display much of the detailed information in an abbreviated form.
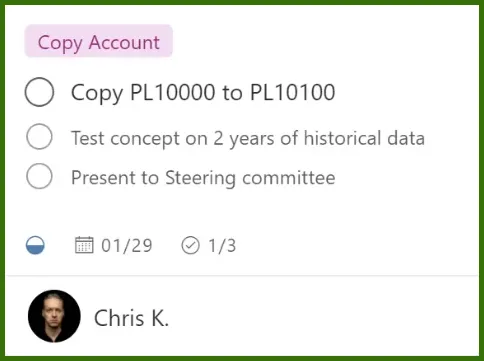
Completed tasks do not show up on the summary card.
NOTE: Displaying certain details, such as “Notes” will come at the cost of displaying “Checklist” items (and vice-versa.)
Adding Comments
When adding comments to a task, clicking the “Send” button performs two actions:
- A comment icon will appear on the summary card for the task, and
- The comment will be posted in the Outlook shared mailbox for the team.
Using the Keyboard for Navigation
If you are one who enjoys steering your computer via a keyboard instead of a mouse, you can use the TAB and SHIFT-TAB keys to move through the list of Buckets. Once you are on the desired Bucket, you can press the ENTER key to start a new Task.
Duplicating a Task
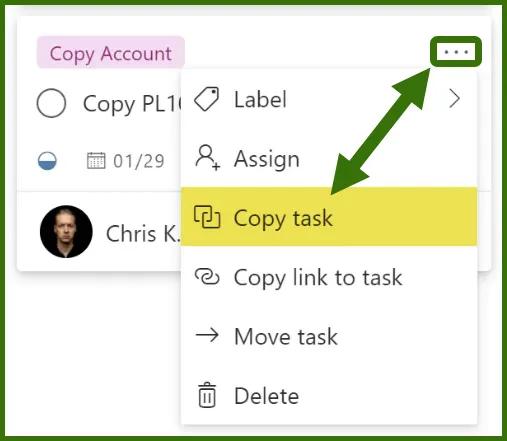
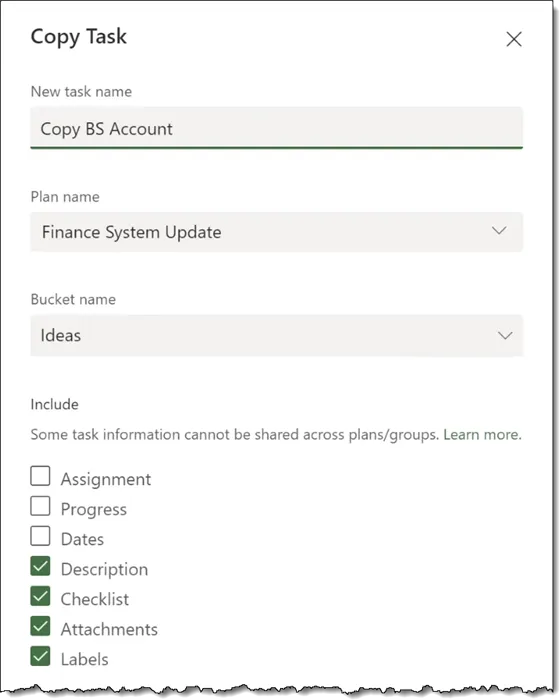
If you want to create a new task that is largely similar to an existing task, but you don’t want to “reinvent the wheel” by entering in all the same detailed information, you can click the Options button (three horizontal dots in upper-right of the card) and select Copy Task.
Here you can give the new Task a name and decide on a feature-by-feature basis which details to copy from the original task to the task copy.
Live Collaboration with Task Attachments Using SharePoint
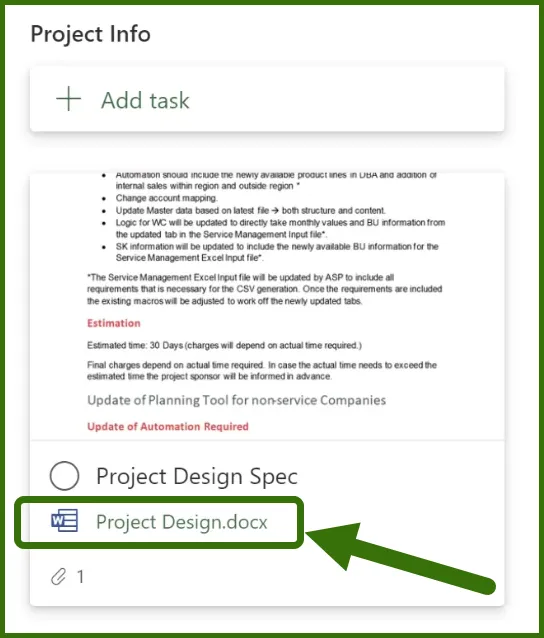
When a file is added as a Task attachment, the file will appear as a hyperlinked thumbnail.

When the file link is clicked, the document is opened directly on SharePoint.
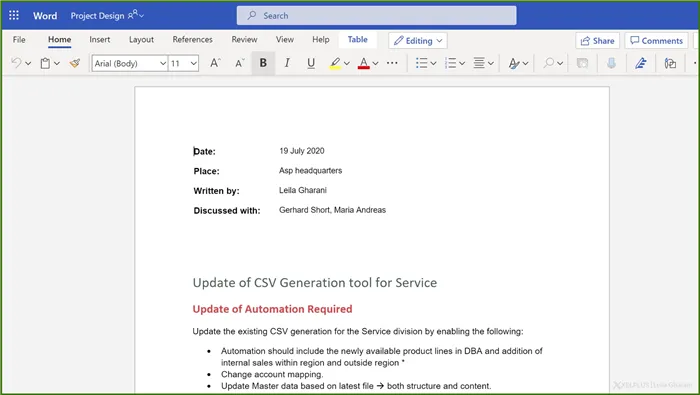
Any changes made will be recorded directly within SharePoint. This also applies to file attachments loaded from a local computer. The file is copied to the SharePoint folder where it functions as a standard SharePoint file.
Moving Tasks Between Buckets
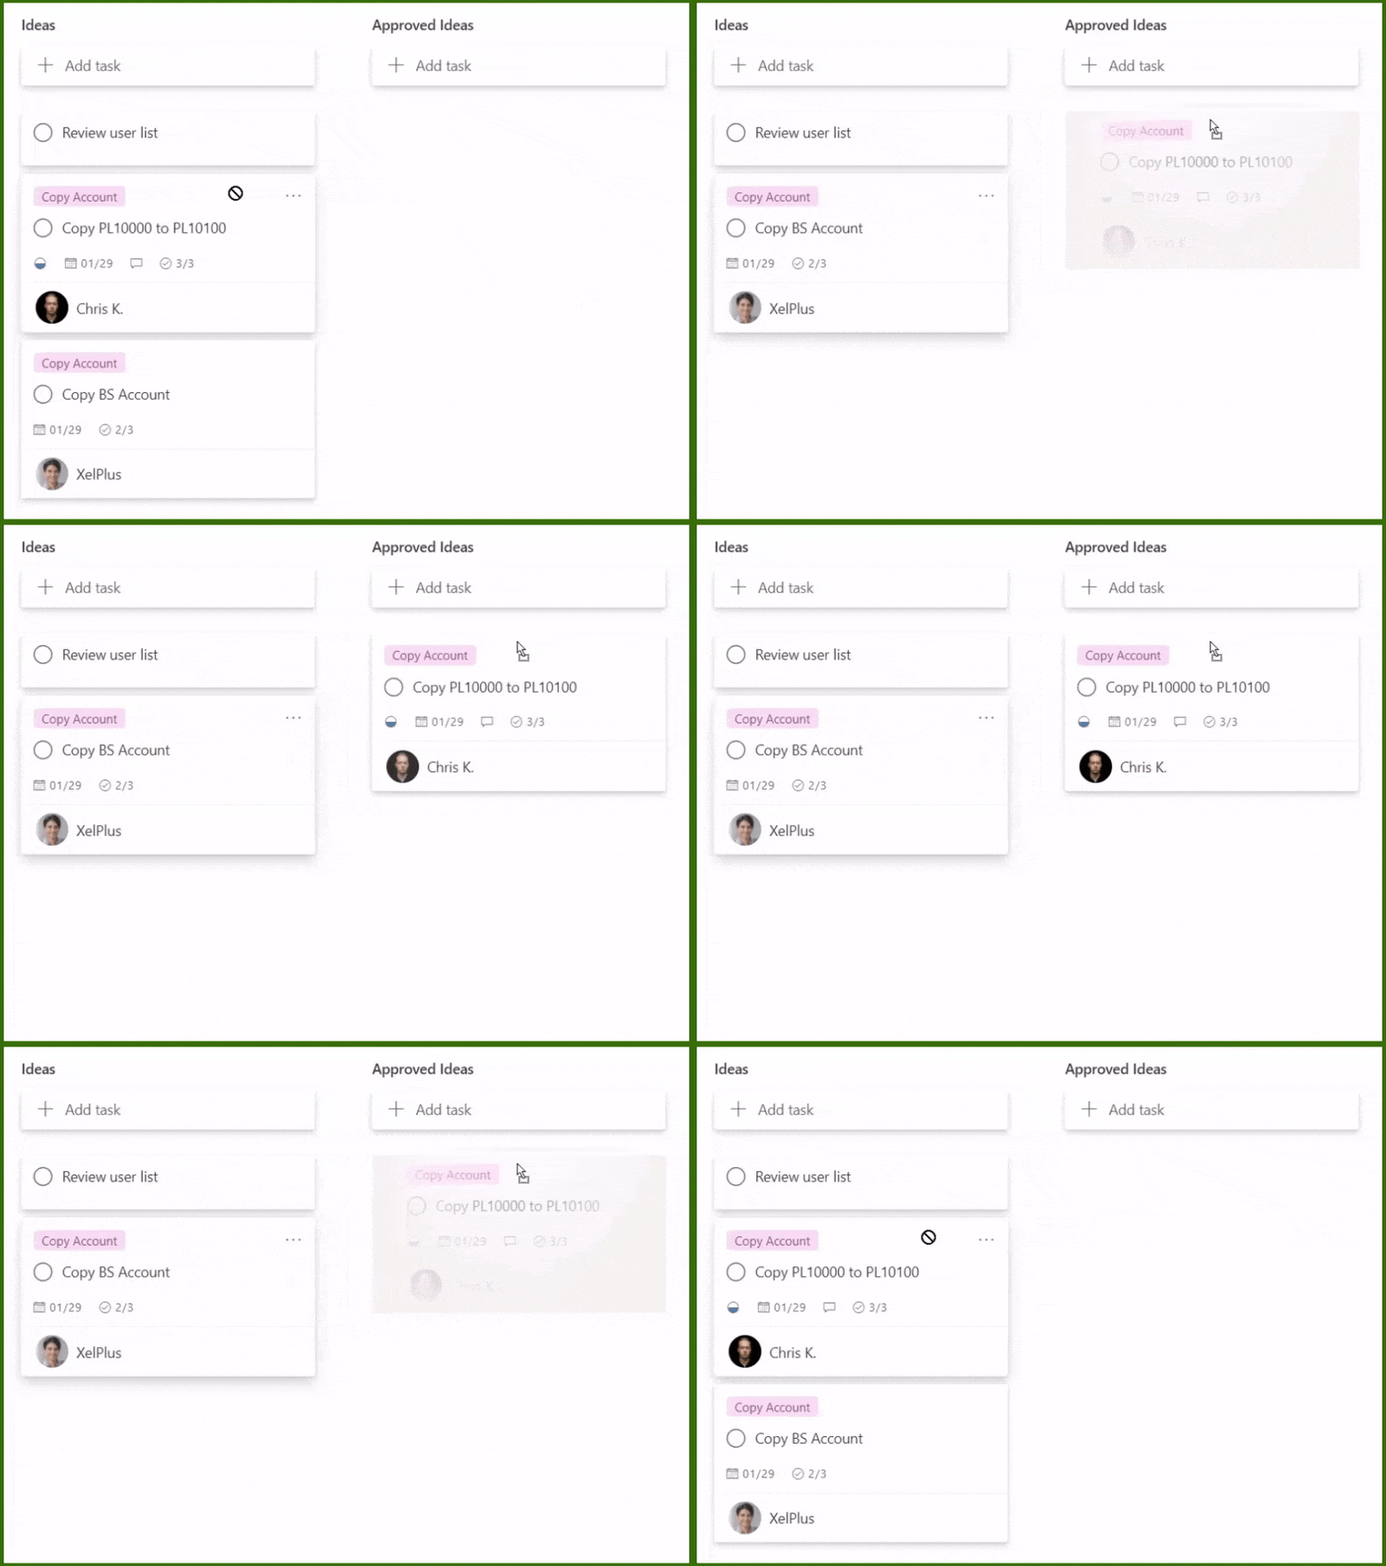
Suppose you have a model where each bucket represents a phase of the project, and you need to move a task to the next phase once certain objectives have been met. You can move a task to a different Bucket by clicking-and-holding the top edge of a task and dragging it to a different Bucket.
You can also alter the assigned bucket in the details of the Task’s card.
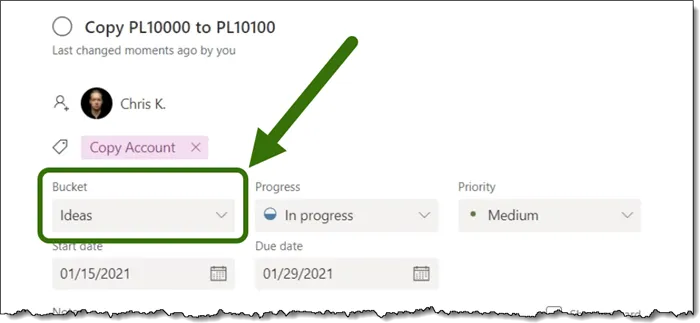
If new team members are added to the Task when placed in a different Bucket, those new team members will receive an email notification and be able to review the history of the task.
Once the Task has accomplished its duties for this phase, the Task can be moved along to the next phase (Bucket).
Completing a Task
Once a Task has fulfilled its responsibilities, the Task can be marked as Completed at which point the Task will be archived.
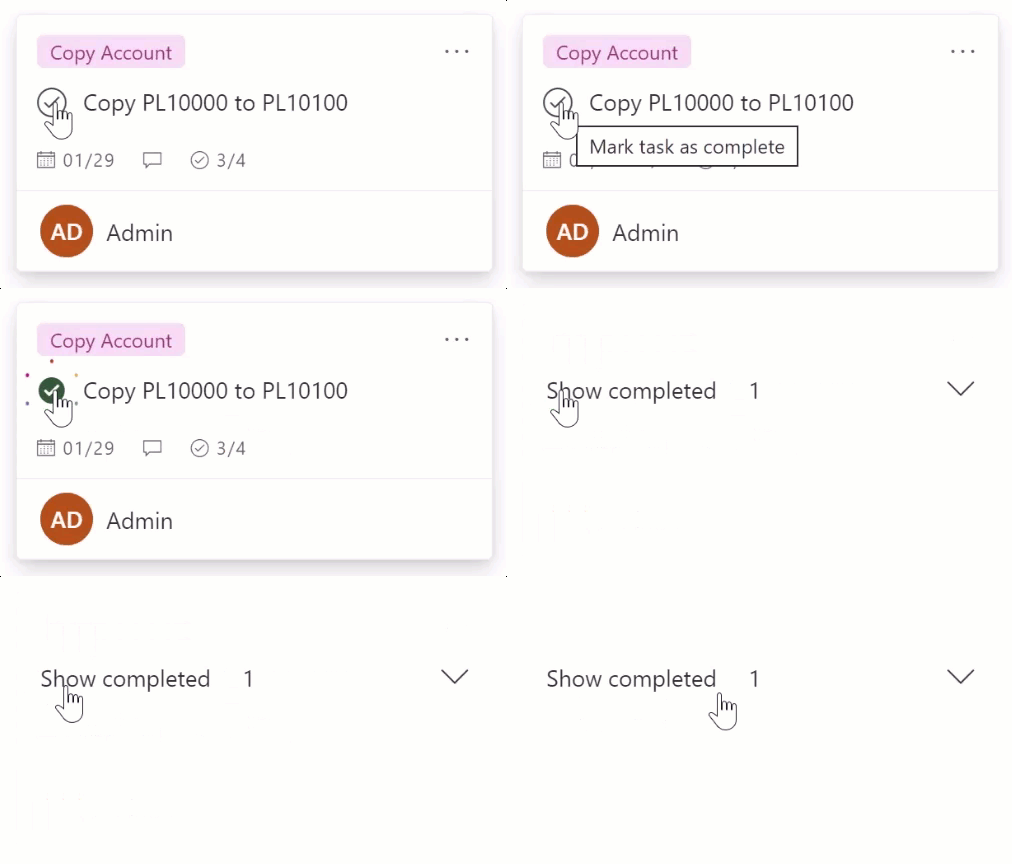
If you need to revive the Task to perform additional actions, you can mark the Task as “In Progress” to return the Task to a status that allows for editing and tracking.
Deleting a Task
If you need to delete a task, click the Options button, and select Delete.
Planner Views
Planner has several ways to view information:
- Boards
- Charts
- Schedule
The Board View
You can also arrange the cards of Tasks in different ways using the following Group By options:
- Buckets
- Assigned team members
- Due Date
- Progress
- Priority, etc…
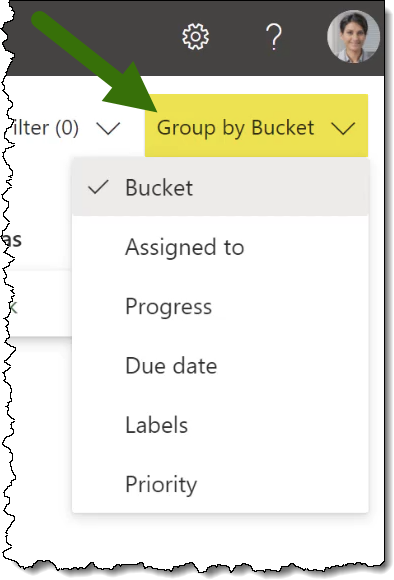
To reduce clutter and allow you to focus on specific Tasks, cards can be filtered by:
- Time period (Late, Today, Tomorrow, This Week, Next Week, etc.)
- Priority
- Progress
- Label
- Bucket
- Team member assignment
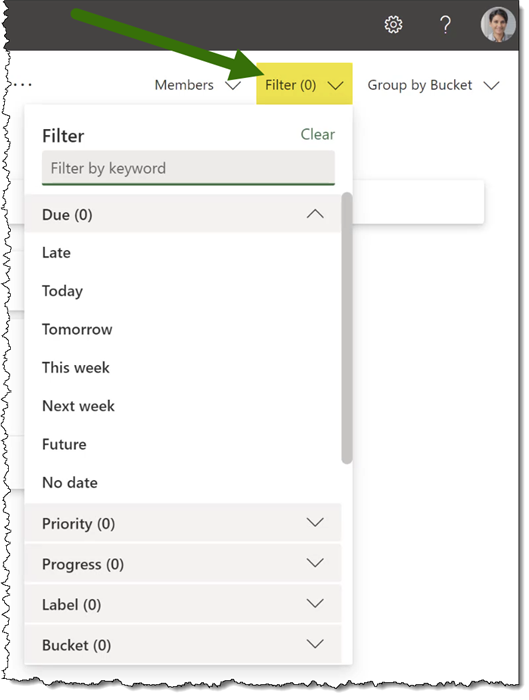
Each of these filters behaves as a toggle; click once to apply the filter, click again to remove the filter.
The Charts View
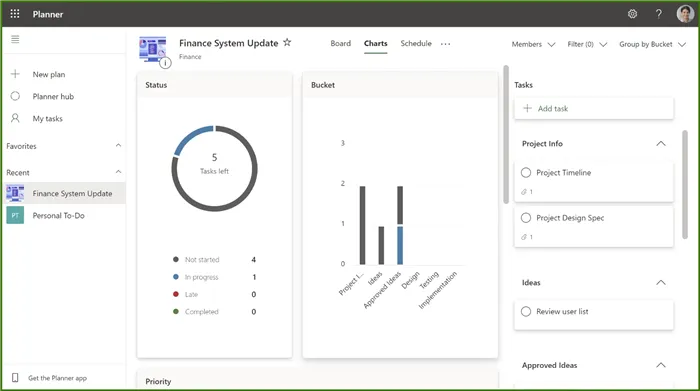
The Charts view displays a report of how many tasks are running late, in progress, completed, etc.
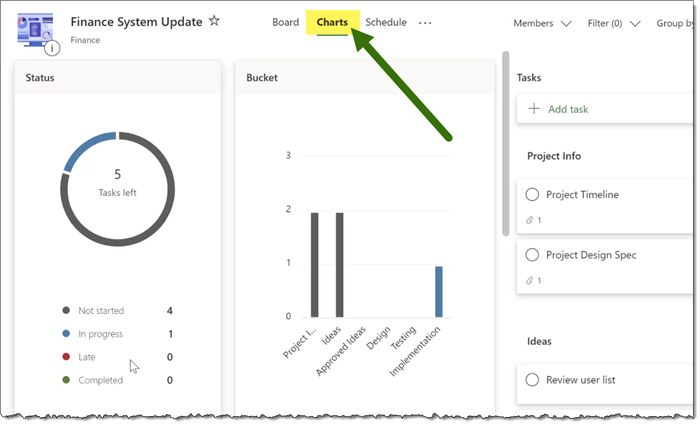
You can see how many tasks each Bucket contains.
You can see how many tasks exist given a set priority.
Also, the tasks can be displayed based on team member assignments. This is a good way to see if the workloads are balanced.
The Schedule View
The Schedule View provides a calendar-esque view that shows how many tasks have been assigned due days by date.
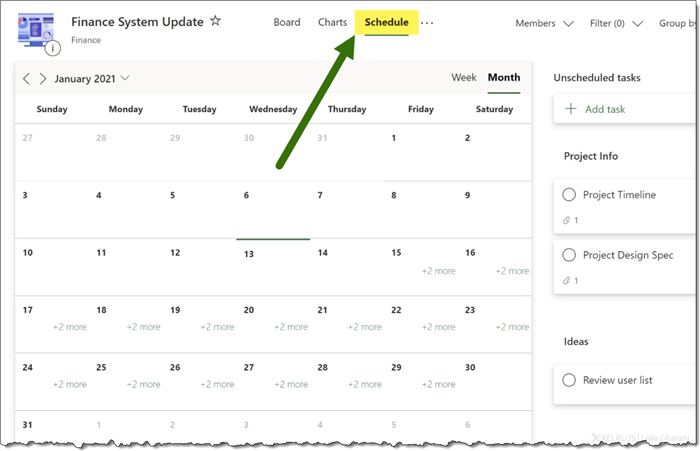
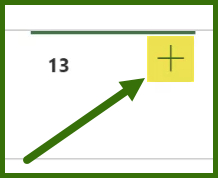
New tasks can be created with a pre-assigned due date by clicking the “plus button” in the upper-right of a calendar date’s box.
The right side of the Schedule view displays all unscheduled tasks.
Exporting a Plan to Excel
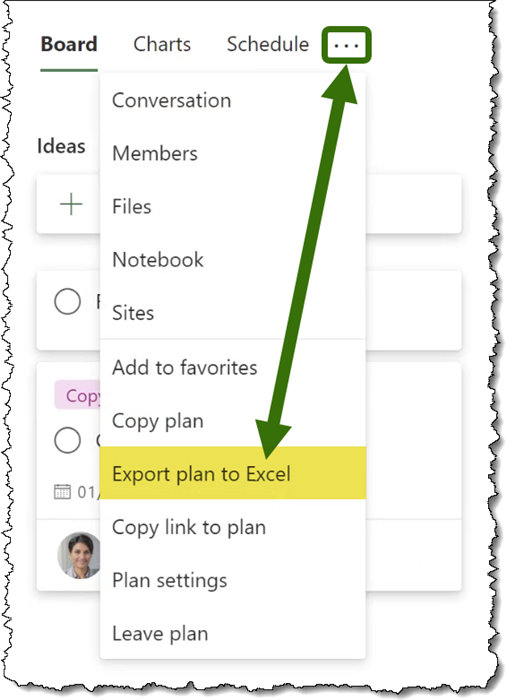
If you need to export the plan information to Excel, click the Plan’s Options button (located to the right of the Plan’s Views) and select “Export plan to Excel”.
Keeping Track of Your Task Assignments
Because you can be a member of many tasks that occur simultaneously, it can be difficult to keep track of all your assignments.
To assist with this problem, click the “My Tasks” link (upper-left) to display all assigned tasks regardless of Plan. This acts as a global filter.
Adding Microsoft Planner to Microsoft Teams
If you are a fan of Microsoft Teams, Planner can seem like a natural extension of Teams.
To integrate your Planner information within Teams, follow these simple steps:
- Open Microsoft Teams
- Select the applicable Channel
- Click the “plus” button at the top-center of the screen
- Select Planner from the list of apps (It is labeled “Tasks by Planner and To Do”)
- Create a new Plan or select an existing Plan
- Click Save
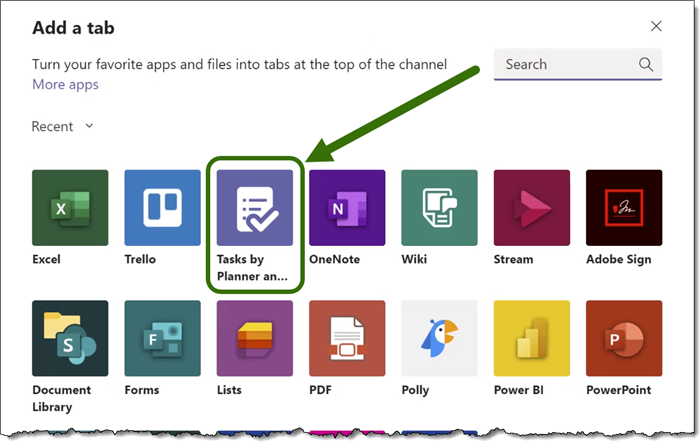
The Plan is integrated into the Teams channel. You can now view all the information for that Plan within Teams without switching applications.
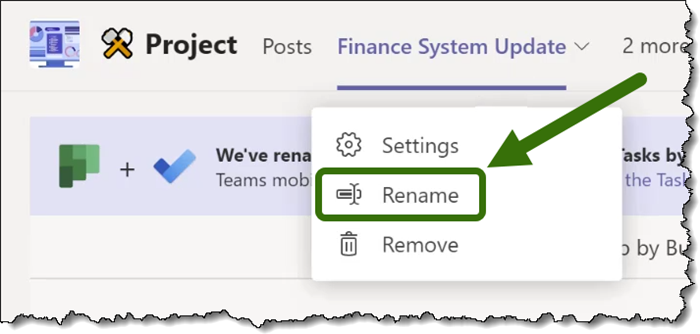
If you are unhappy with the native Plan name, you can right-click the Plan name and rename it to something more to your liking.
Leila Gharani
I'm a 6x Microsoft MVP with over 15 years of experience implementing and professionals on Management Information Systems of different sizes and nature.
My background is Masters in Economics, Economist, Consultant, Oracle HFM Accounting Systems Expert, SAP BW Project Manager. My passion is teaching, experimenting and sharing. I am also addicted to learning and enjoy taking online courses on a variety of topics.


